Tuesday, August 31, 2010

A needle felting project to be hopefully


This is Albert my 18 year old Galah or Rosie breasted cockatoo as the Americans like to call them haha. He's a character and one day I'd like to be good enough to needle felt him or perhaps have someone needle felt him for me. Like a pet portrait type thing I see on Etsy. We adopted him just before Christmas last year from a friend who runs a parrot rescue shelter. He says good boy, Bert, puss puss, Ziggy and hello, his original owners must have had a cat hence why he says puss puss. He'll also purr like a cat so I think he's got a cat complex. They also had a dog called Ziggy and whenever we leave the house he'll call out excitedly ZIGGY ZIGGY ZIGGY.

He loves a chin and head scratch as you can see, he's the most friendly bird I've ever met, he's never bitten and loves attention. He follows me around the house, waddling its the cutest thing ever.

As you can see I'm in my favorite armchair and my felting goods are beside me on a table haha. That's how I work watching tv usually with the felting foam on my lap. I'm also in love with my vintage curtains that I found at an op shop recently. I love vintage finds.


Monday, August 30, 2010

Moon Bear

I forgot to add this in my earlier post today but this is a project I'm still working on ^^ he's called Moon bear, the moon shape is wet felted in merino silk blends and the bear is a merino mix wool. I'm still working on the detailing though such as making the arms a little more solid and what not. Then I'll work out a way to turn him into a mobile or somehow to hang him up somewhere.

How should I string him up? I'm thinking maybe ribbon... not sure yet though I'm still in the thinking process for him lol I'll take some better photos of him when he's finished hopefully before Friday. As you can probably guess I have craft adhd! I'm forever jumping between projects. I'll start something and already have an idea for the next one.

Sunday, August 29, 2010

Cat and Doll


http://woolpets.typepad.com/ is where I got this idea for the little girl I've created recently. She is made from wensledale locks and merino mixed wools. The cat was also an inspiration from wool pets I love that simple style. I wont be posting much unless I make something other this week just because I'm preparing to get my wisdom teeth taken out on Saturday. So tomorrow I'm going to the doctors cause I'm asking for a sedative as its a local and I'm scared out of my willies about the whole thing as I thought I'd be asleep throughout it. Last week I had a clean and de scale done and I was crying through that and it wasn't the pain as there was none its just I'm really phobic about the dentist. So you can imagine how I'll be on the actual procedure day! not looking forward to it at all. I'll be fine after I can cope with pain as I've got a high tolerance to it but just the thought of their hands in my mouth and all the tools scares me.

Saturday, August 28, 2010

Secret Key

Turn that golden key
what do you see?

See those birds in the sky?
you look at me with the evil eye

Hollow and black, loose and slack
is this all we got?

A world with color, sound, heat, blistering hot
Turn that secret key

How? is he higher than you do we bow?
If you turned that golden key would you get to see me?

Lose the crap, lose it, you can do it in a snap
Turn that secret key, is it beneath you? is it beneath me?

Turn around, anti clockwise... what do bodies mean, alien, three eyes?
Golden secret key is it real like you and me.

I haven't felt like writing in ages so excuse the randomness of it, its late
at night and I tend to get weird inspiration like this. No real meaning I just like
this kinda style and secret key kinda got to me.

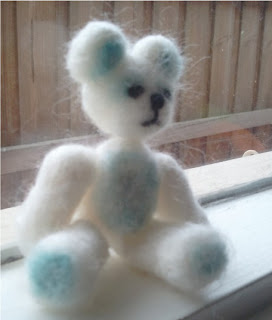
Whispers the bear

This little two inch bear is Whispers, she's made from a silk merino blend (white color) and the teal color is kid mohair that is created by my friend Tess. I've mentioned her before in this blog she's from NZ. Anyways Whispers was created and needed a home, Kaylee my friend from sewing class surprised me with a book called Pass me a smile. I've still got to take photos and do a proper catch up on my items. But its a cute little book with sewing, needle felting and wet felting projects so Kaylee knew I would enjoy the book and she wasn't wrong. So to thank her I gave her Whispers, she was still in my sewing bag cause Kaylee had missed one week where I was originally showing Whispers off. So now Whispers lives on this window ledge happily sun baking and watching over Kaylee and her family.

Wednesday, August 25, 2010

Nutters the Squirrel

I've been reading up on photography tips and am so happy with how Little Nutters the squirrel has turned out. I experimented with Litlte Nutters cause I used some of my cashmere lop's bunny fur on him, its the white you see and it felted really nicely so now I'm thinking of bagging 10 gram bags up to see if they'll sell. I've also got another lop boy bunny who's natural gray and brown colors so it'll be a nice mix. The fur is super clean and really does felt nicely.

Anyways meet Nutters the squirrel


Sunday, August 22, 2010

Wizard doll


This is a needle felted Wizard I've completed over the weekend, I bought Kay Petals dvd workshop and sat down with it finally. He's unnamed at the momment and not totally finished as I want to create a staff for him to hold. Just need to work out how to give the wool that knobbly wooden texture before I get started.

Anyways he's about 12 inches tall have to measure him to be sure, he's made from merono core batting, merino wool roving in beige for skin color, merino batting in black for robe, merino wool roving for pants and shoes in orange and brown. Hair is a mixture of acrylic and wool.

Sunday, August 15, 2010

How to needle felt a heart without a cookie cutter

First off get your tools, you'll need small amounts of colors of your choice of merino roving or other breeds of roving wool. Fleece may work but will probably take longer to felt. You'll need you're felting needles and your felting pad. I use a hard sponge type pad with felt on it to help prolong the life of the pad as it does break up and it helps to protect the wool from getting contaminated as well by the felting pad.


Next hold your felting needle like you do your pen but hold gently


Start laying out the wool in the general shape and start stabbing by going up and down in the same motion so you don't break your needle. You must go in and out at the same direction any bending will bend the needle and therefor will break it.


Start shaping the wool it will look a little odd at first bit it will come together in the end


move the wool gently into the shape continuing gently poking it to help tidy
the fibers together

shaping should continue and if you haven't made a long enough shape just add to the
other side so it is even.

Add color by pulling a little out and laying it on the heart shape, feel the inside as you poke so you can tell the wool is shrinking in the right way.

Keep stabbing wool until it looks like this

Add a small blob of any color of your choice


Peel off gently from pad


Tidy ends now be careful of your fingers at this stage go around the heart and pinch, squish and poke into shape until you are happy.


Here is your abstract heart without a cookie cutter!

wet felted slipper tutorial


I AM A BEGINNER
That said lets get into this, this is the first pair I've created and I only hope to get better.
...............................
First off obtain items such as
wool roving (as much as you can get for this project) or probably at least 200 grams for each foot if about a size nine to ten. Measure and cut template from bubble wrap, to size of foot needed. Lay out wool in different angles so that you can't see any gaps, make it quite thick and have about 5cm overhanging layer from the template all the way around. Dip hand into hot soapy water and sprinkle over wool until very wet.

Rub and pat gently so that the wool begins to form a skin, this is where you can do the pinch test. If the wool doesn't full apart in the pinch test its ready to flip over. In this case leave the 5cm over hanging layer dry so that you can fold inwards at the right time.

Sprinkle dry over hanging layer and fold inwards, gently patting and rubbing so that you slowly start to feel the wool shrinking and binding into one another. Fold inwards all the way around so it looks like a slipper sock is forming.

Place on bubble wrap bubble side up! fold over bubble wrap so it covers the slipper, pat and squish gently. Roll up bubble wrap and slipper so it looks like a sausage and squish the whole way along. Roll gently if needed but not too much. Unwrap it, flip the slipper into a different direction on the bubble wrap and roll it up again and squish and pat again.

Take slipper from bubble wrap and place on draining board take left hand and go from one end to the other gently rubbing it over the board so you feel the wool slowly hardening. This is fulling.

Continue and shape gently and then flip it over. Keep looking for wholes if there are wholes at this stage you can patch it up by gently patting dry wool into that area and then wetting it with soap not the liquid detergent but soap your hands thoroughly and pat the dry wool in so it is slick and feels that it will hold. Continue to full until hardened.

Take template out of slipper
Rinse in hot and cold water and then start throwing the slipper itself onto the draining board. I do mine each arm for 50 times. This just helps to seal the wool more and strengthen it.

Stretch it out and try it on, this stage is called blocking. You will probably need to pull it gently so it feels like its fitting. Make sure that the wool isn't thin before you do this otherwise you may need to start over. Once fitted take off and then stuff with paper or bubble wrap to help keep the shape when drying.

I hope you like my tutorial I am a beginner myself and am slowly learning the techniques. This is my own instructions and I would love it if you emailed me your photos if you made anything from this.

This tutorial is very basic and shows you how to make a seamless pair of slippers. My next tutorial will show you how to decorate them because of the color I'm going to decorate them with watermelon colors and will get a pair of soles to put onto the bottom to keep them sturdy.

Just so you know that the steps these photos show are from the template of bubble wrap and upwards. And as you can tell I'm a basic photographer. So I hope these make sense.

Please let me know what you think

happy felting

Friday, August 13, 2010

Twit the little birdie


This is Twit a little needle felted bird I got the instructions from Little felted friends book which is awesome for beginners! I changed it up a little by making him chubbier and added yellow instead of orange. I don't like to stick to rules that often as you can probably tell.

Twit was made for a friend of mine, an online friend but their all one in the same in my books whether real life or not. She helped me get out of my depressed slump by sending me a lovey package of kid mohair. She has her own goats! lucky her I'm still trying to convince oh to let me get an alpacca at least but no such luck for me as of yet. So now Twit happily lives in New Zealand with my friend Tess hoping to get a permanent home in her soon to be bult studio.

I finger knitted the little green loop around his neck and realised he looks a little funny with it around his neck as it looks somewhat like a noose perhaps but I didn't needle it strongly onto the bird so it can also be an ornament not just a hanging one.

I'm waiting on an image of a bear I did in her lovely teal colored kid mohair bat as I gave a bear to my sewing friend Kaylee as she surprised me in sewing this week by giving me a book. I've been drooling over it for awhile now and its called Pass me a smile I think other countries might know it as Felt me a smile. I can't wait to get started on some of the projects.

I haven't been posting that much lately I've had a really bad ear ache and will be seeing the ear specailist in about six weeks, that's the waiting list for the local one and we're not even rural!

But other than that things are good I got Kay Petal's Needle felting doll dvd set that I bought over Ebay finally it arrived yesterday and I did a pracice head but I'm not happy with how its turned out so I'm gonna try again over the weekend when I get the time or inclination to do so.

So anyways Twit is all made out of merino roving. She also wears some yellow wool that I died myself, I'm really happy with how vibrant the color came out. Tess was impressed too as she dies with eco dies such as almond shells and onion skin. She told me about solar dying so I'll give that a go when its summer as its winter here in good old Australia/Melbourne. I want to try some different wool when I get the chance. I'm hoping to go to Lincraft to check out what they have in the way of wool roving. Lincraft is a super mega store for craft, sewing and knitting supplies as well as other supplies same with Spotlight I shop there too mainly.

Anyways hope you like this little update.

Sunday, August 1, 2010

Wet felted pod bag


This is a wet felted pod bag I felted today, using instructions from a book which I will be reviewing later for the blog. I've used the same wool I used for my scarf but without the base white color so I used merino in blue and chocolate and the last bits of kid mohair from my friend Tess.

I used a template out of bubble wrap cut into a circle, I laid the wool down first, dampened it and then placed the template onto that. Then I cut out a smaller circle with a whole in that to create the whole in the pod bag. And I massaged it gently to form a skin and then rolled it all bubble wrap and all in a bamboo mat and rolled for about 500 rolls.

I'm quite happy with the results